Published on: 09/07/2021 Updated on: 20/02/2025
How to take care of the Kart with Sabino de Castro's advice and Mafra products
In the tutorial series by Sabino de Castro, the kart instructor pilot explains how to take care of the kart and keep it in the best condition at all times. In the videos, Sabino explains the proper techniques for taking care of the kart by relying on products from Mafra's Professional line.
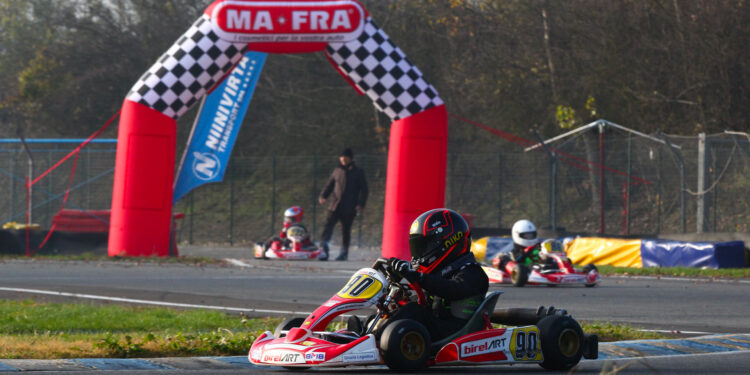
In Italy, the karting market is growing steadily, and more and more young people are approaching this discipline. These are often very young boys who love speed and want to pursue a career as a driver, starting from what is considered the first school for learning to race on the track. Sabino de Castro is not only an accomplished driver but also a kart instructor. With his Karting School Birel ART gives very young drivers the opportunity to approach the fantastic world of track racing. In a series of video tutorials, Sabino de Castro explains how to take care of the kart properly!

Who is Sabino de Castro
Born on June 30, 1985 in Rho, just outside Milan, Sabino de Castro boasts a career that has seen him race cars of all kinds. Like most of his colleagues, he started on karts, achieving several successes, and then tried his hand at GT cars where he became Italian Gran Turismo Champion three times - 2017, 2019 and 2020. Today he is also a kart instructor and founded his own Karting School in collaboration with Birel ART, a well-known kart manufacturer based in Lissone. The school's goal is to give very young drivers (from age 5) the opportunity to approach the world of karting for the first time and, for the more experienced, to perfect their driving technique for competitive activity.

The connection between Mafra and Sabino de Castro.
For several years now, we at Mafra have been technical sponsors of Sabino de Castro, supporting him both in his experience driving Gran Turismo cars and in his Karting School experience. Passion for racing and the desire to grow the champions of the future are the things we have in common. Knowing that, thanks in part to our support, we can help young drivers achieve the dream of becoming professionals fills us with pride.
How to take care of the kart: the tutorials by Sabino de Castro
Sabino wanted to make his knowledge available to all enthusiasts by making a series of tutorials to explain how to take care of the kart to always have it in the best condition when going out on the track. We also supported him in this project by providing him with products from the line Tecnica Mafra, a guarantee for various maintenance operations. Don't miss any of Sabino's tutorials, below you will find all those published to date!
- How to Put a Birel Art 50 Training on Track
- How to put a Birel Art 60 Easykart on the track.
- How to charge the battery
- How to replace the 50cc engine
- How to replace the tires of a 60cc
- How to clean the clutch bell
- How to replace a 60cc engine
- How to replace the pinion gear
Watch all of Sabino de Castro's video tutorials on how to take care of the kart
How to Put a Birel Art 50 Training on Track
Sabino de Castro's first tutorial is dedicated to the Birel Art 50 Training and everything you need to prepare it before you hit the track.
The Birel Art 50 is the ideal vehicle for pre-competition. A kart equipped with a 50cc engine with a power of 3hp, ideal for those who want to approach the karting discipline. In the tutorial, Sabino explains what needs to be done before putting this kart on the track.
The first step is a check of the nuts and bolts, in general, to make sure everything is tight, and then move on to the tires. Use a pressure gauge to make sure the pressure is between 1.2 and 1.6 bar. The next step is to make mixture with a 5 percent kart oil.
Now it's time to start the engine: put the switch on zero, squeeze the decompressor and pump the mixture under the carburetor until you feel it return to the tank. Open the air in the carburetor and take the ignition cord; with a sharp blow start it, being careful not to pull it all the way, lest you risk ruining the gears. As soon as the engine starts, close the air and let it run on the stand for a couple of minutes so that the engine warms up.
Now the kart is ready to go around the track!
How to put a Birel Art 60 Easykart on the track.
In the second tutorial, Sabino explains how to put a Birel Art 60 Easykart on the track., the perfect kart for 9- to 13-year-olds tackling their first competitive category.
Again, the first thing to do is to check the bolts and then move on to tire pressure. Initially, the pressure should be from 1.2 bar and up; then when you start to turn on the track and the asphalt starts to warm up, it is time to go down to 0.9 bar.
After checking the tires, insert the Freeline battery, which must have been previously charged. The battery is located under the ECU, to which it must be connected via its connector. After connecting the battery, turn on the ECU and you will see the red LED on the steering wheel light up.
Now is the time to get gasoline to the carburetor. Remove the intake silencer with the 7 wrench provided, close the carburetor intake with the palm of your hand, and press the ignition button. When your palm is wet with gasoline, it means that gasoline has reached the carburetor. At this point remount the muffler and press the green button on the steering wheel, the kart will start. To turn off the kart use the red button.
 Useful advice: always remember to grease the chain well Before going to the track. Catenoil Is the perfect product for this operation! A spray grease that leaves a lubricating and water-repellent film, a tough, highly protective film that makes the stressed parts work always at the highest efficiency, even under the most exasperating conditions.
How to charge the battery
Birel Art Easykart karts require a battery to power the ECU, and like all batteries, it must be recharged. In this tutorial, Sabino de Castro shows us the procedure for proper battery charging.
Using the battery charger
With the LIPO Freeline battery comes the specific charger and all the necessary connectors for charging. The first thing to do is to connect the power cord, then connect the Freeline connector adapter being careful not to reverse the poles: red (positive) and black (negative).
Then proceed with the stabilizer, connecting the appropriate cable to the charger to which the circuit board must be connected, which in turn must be connected to the battery. After you have made sure that you have connected all the cables correctly, you can plug in the power: you will see a red light come on on the charger.
Verify that the LIPO light is selected, which corresponds to the type of battery you are about to charge; then with the appropriate button select the 3A light, corresponding to the amperage of the battery. Finally, press the Start button to start the charging cycle; when the green light begins to flash, charging is complete.
How to replace the 50cc engine
We have arrived at Sabino de Castro's tutorial on how to replace the engine of a Birel Art 50 Traning, the ideal kart for children from 6 to 10 years old facing their first steps in the world of karting, in the pre-competitive category.
First thing to do: remove the gas wire! For this you need a 3 Allen wrench to disassemble the clamp that holds the throttle wire. With a 6 Allen wrench, proceed to disassemble the engine cover; then remove the chain starting on the sprocket side and moving on to the sprocket. Finally, with a 5 Allen wrench, remove the chain guard.
At this point the engine is completely free is you can easily replace it.
How to replace the tires of a 60cc
In Sabino de Castro's fifth tutorial you will discover how to disassemble the tires of a Birel Art 60 Easykart. For this operation, you need a tire changer scissors with its accessories (centering pin and wheel), a bead breaker and the wrench to disassemble the pressure valve.
Disassemble the front wheels
First, take apart the pressure valve and let all the air out. Helping yourself with the bead breaker, pull the tire off both sides of the rim. Be careful to always place the bead breaker away from the air valve. Then with the scissors pry the side of the tire off and with the pin stuck in the rim open the scissors until the tire comes off. Now one side of the tire is detached from the rim; to detach the other side as well, you will just use the scissors and pry to completely remove the tire from the rim.
Disassemble the rear wheels
The rear rim does not have bearings like the front rim. Therefore, you will need to use the centering tool that comes with the scissors for this operation. After deflating the tires and beading the tire off the rim, place the centering on the inside of the rim, then pry the tire off with the scissors and insert the pin, and then open the scissors and pull the wheel off the rim. Finally, remove the centering pin and, again using the scissors, pry the other side of the rim off the tire completely.
Mount the front wheels
 Before mounting tires, Sabino de Castro's advice is to. Clean the rim both inside and outside with a product like Sviting. Due to its lubricating action, it will make the operation easier!
Place the rim about halfway up the tire and apply gentle pressure to get it in. Once the rim is inserted into the tire turn it around on the opposite side and use the scissors by placing the black guides on the tire and threading them under the rim. After inserting the pin, open the scissors and in a moment the rim will fit into the tire. At this point, before putting the valve back on, inflate the tire to bead it. Removing the valve is important to let air in more easily, making it easier to bead the tire into the rim.
Mount the rear wheels
As with the front wheels, clean the rim and insert it into the tire. Use the centering rim to complete the job and place the black guides on the tire and under the rim. Thread the pin through and open the scissors to get the rim into the tire. Inflate the tire until it is beaded and then reinstall the pressure valve.
That's it, you're ready to hit the track!
How to clean the clutch bell
In the sixth tutorial, Sabino addresses a very important topic: the cleaning the clutch bell.
One important note: According to the technical rules, at the end of the race the bell must be clean and have no grease residue, otherwise you risk disqualification.
Disassembling the bell
For this video, Sabino uses a 100cc engine but the procedure is the same for 60cc and 125cc engines. The first step is to remove the bendix cover and the clutch assembly cover: you will need an Allen wrench size 5 for this operation. Insert the sprocket block and with a size 17 wrench remove the bellhousing tightening nut.
A helpful tip: When you disassemble the bell nut, place the nut and all subsequent shims on the workbench in the order in which you disassemble them. This way you don't risk getting the sequence wrong when reassembling.
Clean the bell
 With the covers removed and the bell unlocked, you can disassemble it and proceed with cleaning. Use an all-purpose degreaser such as Deterjet, a product capable of quickly remove all kinds of dirt, grease and oil.
First, superficially clean the clutch, then the bell, helping yourself with a microfiber cloth until you have removed all dirt residue.
Reassemble the bell
When the bell is well cleaned, reassemble everything following the disassembly sequence in reverse, starting with the bell fastener and ending with the bendix and clutch assembly covers, after removing the crown lock. When you mount the cage on the retaining nut, check that rotating the bell does not make noise, otherwise it needs to be replaced.
A useful tip: Do not over-tighten the screws of the bendix cover, because it is plastic and you risk ruining it. The bell fastening nut, on the other hand, should be tightened fairly firmly but not excessively, always taking care to act by pulling and not pushing.
Clean the bell and clutch assembly every time you go to the track!
How to replace a 60cc engine
In the seventh tutorial, Sabino de Castro explains how to disassemble a 60cc engine and then replace it.
First you need to pull out the gas wire by using a 3 Allen wrench to unscrew the clamp that holds the wire. After pulling the gas wire out, disassemble the intake muffler. Use a 7 hex wrench to loosen the clamp and then remove the muffler.
Now it is time to remove the fuel line from the carburetor. Remember to blow into the hose to get the gasoline back into the tank. Finally, disconnect any electrical wires, such as the micro, and remove the Bus Cable that connects the ECU to the engine.
After disconnecting all the cables you are ready to disassemble the engine starting with the chain cover with a 10 hex wrench. Then move on to the muffler, use pliers to remove the springs and then pull it off the manifold.
To disassemble the engine you need to remove the U-bolts that are under the engine. You will need an 8 Allen wrench for this operation. Before removing the engine remember to pull the chain off, always starting at the sprocket and then moving to the sprocket side.
Now the engine is completely free and can be replaced with a new one to get back on track even more competitive!
How to replace the pinion gear
In Sabino de Castro's eighth tutorial we tackle the topic of how to replace the sprocket. An important operation to improve the performance of the kart.
After disassembling the engine, proceed by removing the bendix cover and the clutch assembly cover, then remove the bell housing by inserting the sprocket retainer and with a 17 wrench unscrew the retaining nut. Since the sprocket is to be replaced and it is not a problem if it gets damaged, you can clamp it in the vise.
Before heating the bellhousing it is important to clean it well, grease residue with heat can generate annoying smoke. Once the bell has been heated it is time to unscrew the 4 screws that hold the pinion: unscrew them one at a time with a 3 Allen wrench. Be careful not to touch the screws with your bare hands, they have been heated and you risk getting burned, so always use a cloth or gloves.
A useful tip: It is important to always use new screws each time you change the sprocket.
To mount the new pinion, place the bell on the work surface, remember that it may still be very hot so do not touch it with your bare hands.
Position the sprocket at the screw holes and start pointing them one at a time. When you have aimed the first screw clamp the bell in the vise and then proceed with the other screws. When all the screws are properly pointed you can proceed to fasten them individually, crosswise if possible. To properly tighten the screws one hand should be perpendicular to the bell and the other should be used as a stop.
At this point the bell with the new sprocket is ready to be reassembled on the engine and you are ready to get back on the track!
Follow the page YouTube of Sabino de Castro to also discover all the many onboard videos on racing cars, from formulas to Grand Touring cars.
Keep following us on our social channels for many more useful tips on care and maintenance of any vehicle!
Want to stay up to date with our promotions?
The best Mafra products with special discounts and unmissable offers are waiting for you. Sign up for our Newsletter to receive our discounts and stay updated on the world of Mafra! What are you waiting for?
Keep following us on our social channels for many more useful tips on car care and beyond:
![]()
![]()
![]()
![]()
![]()
![]()
![]()


✅ Azione profonda e decisa contro sporco stradale e traffic film✅ Tecnologia IRON STOP per migliorare la qualità dell’acqua✅ Sicuro su tutte le superfici, anche con temperature elevate✅ Compatibile con sistemi di depurazione enzimaticiPerfetto per piste box self e impianti cannon foam, Mojito Cannon Foam è la scelta di chi vuole un lavaggio ad alte prestazioni e ad alto impatto visivo.📞 Non sei ancora cliente Mafra? Chiama il concessionario di zona per una prova gratuita e una quotazione personalizzata basata sui tuoi consumi!👋 Sei già cliente? Contattaci per scoprire il nuovo Mojito Cannon Foam #mafra #mafraprroducts #MojitoCannonFoam")


